Welcome

I am a stay-at-home mother of 3 living in Utah...who desires to learn more regarding cooking and baking. I hope through my culinary adventures I will learn enough to cook and bake decent food and maybe help fellow moms with their struggles in the kitchen.

Wednesday, June 9, 2010

Flourless Peanut Butter Chocolate Chip Cookies


Ingredients:
1 C Peanut butter, reduced fat
3/4 C Sugar
1 large egg
1/2 tsp baking soda
1/4 tsp salt
3/4 C semi-sweet chocolate chips

Preheat oven to 350* F. Combine peanut butter with sugar until blended. add egg and soda and salt and blend. Add chocolate chips. Form into 24 balls about the size of a tablespoon. Bake until cookies are golden and puffed around 12 minutes. Let cool on rack for 5 minutes and continue to let cool on rack.

I did change the original recipe and I have not yet finished trying out new alterations. I want to try splenda or stevia instead of sugar, but I have yet done that. When I do I will post my results. I wanted to find a recipe that is satisfying as a cookie but is reduced fat and calories. This cookie turned out wonderful!!!

** I found the original recipe here: http://www.marthastewart.com

Tuesday, June 1, 2010

S'mores Cookies

I found this recipe on http://www.marthastewart.com  and I fell in love! Holy cow were these cookies delish! :D

Ingredients:
  • 1/2 cup old-fashioned rolled oats
  • 1 cup all-purpose flour (spooned and leveled)
  • 1 cup whole-wheat flour (spooned and leveled)
  • 3/4 teaspoon ground cinnamon
  • 1/2 teaspoon baking soda
  • 1/2 teaspoon salt
  • 1 cup (2 sticks) unsalted butter, room temperature
  • 3/4 cup light-brown sugar
  • 1 large egg
  • 8 ounces bittersweet or semisweet chocolate, cut into 30 squares
  • 15 large marshmallows, halved horizontally
Preheat oven to 350* F. In a food processor pulse the oats until finely ground. Add flours, soda, salt, and cinnamon until blended. In your stand mixer blend sugar and butter until butter is light in color. Add egg and mix. Add in the flour mixture and mix just until combined. Drop dough by tablespoons. Top each with a chocolate square. Bake until lightly golden, about 12 minutes. remove from oven and turn broiler on. Top each cookie with a marshmallow and place under the broiler until lightly browned. Transfer to racks to let cool.


Monday, May 17, 2010

Boeuf Bourguignon


I found this recipe on recipezaar.com. I have been wanting to make this for a while, and I got a really nice 6 Qt cast iron enameled pot for Mommy's Day, so I finally was able to make it! I served it over homemade egg noodles and it serves 6.


For the Stew

For the braised onions

For the Sauteed Mushrooms

Steps
  1. First prepare the bacon: cut off the rind and reserve.
  2. Cut the bacon into lardons about 1/4" think and 1 1/2" long.
  3. Simmer the rind and the lardons for ten minutes in 1 1/2 quarts of water.
  4. Drain and dry the lardons and rind and reserve.
  5. Preheat the oven to 450°F.
  6. Put the tablespoon of olive oil in a large (9" - 10" wide, 3" deep) fireproof casserole and warm over moderate heat.
  7. Saute the lardons for 2 to 3 minutes to brown lightly.
  8. Remove to a side dish with a slotted spoon.
  9. Dry off the pieces of beef and saute them, a few at a time in the hot oil/bacon fat until nicely browned on all sides.
  10. Once browned, remove to the side plate with the bacon.
  11. In the same oil/fat, saute the onion and the carrot until softened.
  12. Pour off the fat and return the lardons and the beef to the casserole with the carrots and onion.
  13. Toss the contents of the casserole with the salt and pepper and sprinkle with the flour.
  14. Set the uncovered casserole in the oven for four minutes.
  15. Toss the contents of the casserole again and return to the hot oven for 4 more minutes.
  16. Now, lower the heat to 325°F and remove the casserole from the oven.
  17. Add the wine and enough stock so that the meat is barely covered.
  18. Add the tomato paste, garlic and herbs and the bacon rind.
  19. Bring to a simmer on the top of the stove.
  20. Cover and place in the oven, adjusting the heat so that the liquid simmers very slowly for three to four hours.
  21. The meat is done when a fork pierces it easily.
  22. While the meat is cooking, prepare the onions and mushrooms and set them aside till needed.
  23. For the onion, if using frozen, make sure they are defrosted and drained.
  24. Heat the butter and oil in a large skillet and add the onions to the skillet.
  25. Saute over medium heat for about ten minutes, rolling the onions about so they brown as evenly as possible, without breaking apart.
  26. Pour in the stock, season to taste, add the herbs, and cover.
  27. Simmer over low heat for about 40 to 50 minutes until the onions are perfectly tender but retain their shape and the liquid has mostly evaporated.
  28. Remove the herbs and set the onions aside.
  29. For the mushrooms, heat the butter and oil over high heat in a large skillet.
  30. As soon as the foam begins to subside add the mushrooms and toss and shake the pan for about five minutes.
  31. As soon as they have browned lightly, remove from heat.
  32. To Finish the Stew:.
  33. When the meat is tender, remover the casserole from the oven and empty its contents into a sieve set over a saucepan.
  34. Wash out the casserole and return the beef and bacon to it (discarding the bits of carrot and onion and herbs which remain in the sieve).
  35. Distribute the mushrooms and onions over the meat.
  36. Skim the fat off the sauce and simmer it for a minute or two, skimming off any additional fat which rises to the surface.
  37. You should be left with about 2 1/2 cups of sauce thick enough to coat a spoon lightly.
  38. If the sauce is too thick, add a few tablespoons of stock.
  39. If the sauce is too thin, boil it down to reduce to the right consistency.
  40. Taste for seasoning.
  41. Pour the sauce over the meat and vegetables.
  42. If you are serving immediately, place the covered casserole over medium low heat and simmer 2 to 3 minutes.
  43. Serve in the casserole or on a warm platter surrounded by noodles, potatoes or rice and garnished with fresh parsley.
  44. If serving later or the next day, allow the casserole to cool and place cold, covered casserole in the refrigerator.
  45. 20 minutes prior to serving, place over medium low heat and simmer very slowly for ten minutes, occasionally basting the meat and vegetables with the sauce.
This was a time intensive dish, but well worth it! Thank you, Julia Child!

Friday, May 14, 2010

Creamy Tuscan Tomato Soup


Ingredients:
2-3 Tlb Olive Oil
2 Lg Onions, diced
5 C Tomatoes, diced & seeded
2 C Chicken Stock
1 1/2 C Whipping Cream
1 C Fresh Pesto*
Salt & Pepper to taste

Heat oil in a large soup pot and add onions. Sweat the onions then add the tomatoes and warm to a simmer. Add chicken stock and bring to a simmer and allow to simmer for 15 minutes. Take off heat and add cream and pesto. Using a hand immersion blender blend until desired consistency. If you do not have a hand immersion blender then you can use your blender in batches.

Fresh Pesto:
3 C loosely packed basil leaves
1/2 C olive oil
1/4 C pine nuts
2 cloves of garlic
1/3 C Parmesan cheese
2 Tlb Romano Cheese
salt to taste


I got this recipe from my mother-in-law that got it off some morning news show. I wish I could say which one and what day, but I have no clue. Sorry

Sunday, April 18, 2010

Fresh Asparagus and Pea Soup

Over Thanksgiving, my awesome sister-in-law, Amber, introduced me to Ina Garten's fresh pea soup recipe. I loved it! In fact, I wanted to make it today. I was so perplexed because I also wanted Emeril Lagasse's asparagus soup recipe. It then hit me...COMBINE and alter the two existing recipes, and change some things. My recipe is AWESOME!. Seriously, you should try this and let me know what you think!


Ingredients and tools:
2 (14 oz) cans/boxes of chicken stock
1 bundle of asparagus
1 (16 oz bag) of frozen petite peas
1 medium red onion, diced
2 tablespoons of olive oil
sour cream for garnish/to taste
cilantro for garnish/ to taste

hand-immersion blender is best, but if you don't have one, your food processor, if you don't have one, your blender. The blender will work, but the consistency will be not perfect.
slotted spoon

Directions:
In a medium stock pot, add the chicken stock and bring to boil. Get the asparagus, snap off the 
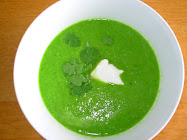
tuff ends and discard, cut the asparagus into 1.5 inches long and separate the spears from the stocks. Add the stocks into the boiling chicken stock and reduce heat and simmer 20-30 minutes. While the asparagus and stock is simmering, get the red onion, dice and sweat the onions in a pan with the olive oil. Go back to the stock: take the slotted spoon and retrieve the asparagus stems from the asparagus infused broth. Add the onion to the broth, bring to boil. Then add the asparagus spears and reduce heat to a more gentle boil. 5 minutes from being tender add the frozen peas and increase heat to bring back to boil. The peas should only take 3-5 minutes. Get the cilantro and and sour cream from the fridge. Once the peas are tender and floating, puree until the desired consistency. Put in dish, serve with the garnishes. YUMMY!!!! It seriously is so scrumptious good and super easy to make!!! I love the combination of these flavors! hmmm yum! Next time I make this I may retain the stems and blend them in with the rest so the asparagus flavor would be more pronounced....


Honestly, I did change quite a bit of the recipes; if you are curious of the two original recipes click here for Ina Garten, and here for Emeril Lagasse.

Thursday, April 15, 2010

Baked Jalepeno Poppers

Ingredients:
  • 12 fresh jalepeno peppers, halved lengthwise, stems, seeds, and membranes removed
  • 6 oz cream cheese, softened
  • 1 ½ cups grated sharp cheddar cheese
  • ½ teaspoon ground paprika
  • ½ teaspoon ground cumin
  • ½ teaspoon garlic powder
  • 2 large eggs
  • 2 tablespoons of milk
  • 2 cups panko crumbs (or fine dry breadcrumbs)
  • 1 cup all-purpose flour
Instructions:
  1. Preheat oven to 350*F. Lightly grease baking sheet and set aside.
  2. In a medium bowl, cream together the cream cheese, cheddar cheese, cumin, garlic, and paprika.
  3. In a small bowl, beat the eggs and milk together.
  4. In separate shallow dishes, pour the panko in one and the flour in the other and set aside.
  5. Fill each pepper up to the top with cheese mixture. (In large jalapeno peppers it could be a tablespoon.)Now you are ready for the breading “assembling line.” Remember to do one at a time and keep one hand as your “wet” hand and one hand as your “dry” hand!
  6. First you dredge it in flour
  7. Second you submerge it in milk/egg mixture
  8. Finally you dredge it in panko, pressing it in to coat it well. (You may need to repeat the process.)
  9. Place directly on baking sheet, cut side up, and bake until the crust is golden brown and the filling is runny. (about 30 minutes)
* I had a ton of jalapeƱo peppers from my garden and wanted some poppers, but did not want the fat from deep frying them. So I came across some on the web and changed the recipe to this. I made them today for a little potluck and they were devoured! Ohh this was tasty! If you try it, let me know what you think! Next time I think I will add more spice, but I didn't want to be too daring on the first attempt. :)

Friday, March 5, 2010

Homemade Marshmallows

 Thank you, Alton Brown!!!

 Ingredients

  • 3 packages unflavored gelatin
  • 1 cup ice cold water, divided
  • 12 ounces granulated sugar, approximately 1 1/2 cups
  • 1 cup light corn syrup
  • 1/4 teaspoon kosher salt
  • 1 teaspoon vanilla extract
  • 1/4 cup confectioners' sugar
  • 1/4 cup cornstarch
  • Nonstick spray

Directions

Place the gelatin into the bowl of a stand mixer along with 1/2 cup of the water. Have the whisk attachment standing by.
In a small saucepan combine the remaining 1/2 cup water, granulated sugar, corn syrup and salt. Place over medium high heat, cover and allow to cook for 3 to 4 minutes. Uncover, clip a candy thermometer onto the side of the pan and continue to cook until the mixture reaches 240 degrees F, approximately 7 to 8 minutes. Once the mixture reaches this temperature, immediately remove from the heat.
Turn the mixer on low speed and, while running, slowly pour the sugar syrup down the side of the bowl into the gelatin mixture. Once you have added all of the syrup, increase the speed to high. Continue to whip until the mixture becomes very thick and is lukewarm, approximately 12 to 15 minutes. Add the vanilla during the last minute of whipping. While the mixture is whipping prepare the pans as follows.

For regular marshmallows:

Combine the confectioners' sugar and cornstarch in a small bowl. Lightly spray a 13 by 9-inch metal baking pan with nonstick cooking spray. Add the sugar and cornstarch mixture and move around to completely coat the bottom and sides of the pan. Return the remaining mixture to the bowl for later use.
When ready, pour the mixture into the prepared pan, using a lightly oiled spatula for spreading evenly into the pan. Dust the top with enough of the remaining sugar and cornstarch mixture to lightly cover. Reserve the rest for later. Allow the marshmallows to sit uncovered for at least 4 hours and up to overnight.
Turn the marshmallows out onto a cutting board and cut into 1-inch squares using a pizza wheel dusted with the confectioners' sugar mixture. Once cut, lightly dust all sides of each marshmallow with the remaining mixture, using additional if necessary. Store in an airtight container for up to 3 weeks.

For miniature marshmallows:

Combine the confectioners' sugar and cornstarch in a small bowl. Line 4 half sheet pans with parchment paper, spray the paper with nonstick cooking spray and dust with the confectioners' sugar mixture.
Scoop the mixture into a piping bag fitted with a 1/2-inch round piping tip. Pipe the mixture onto the prepared sheet pans lengthwise, leaving about 1-inch between each strip. Sprinkle the tops with enough of the remaining cornstarch and sugar mixture to lightly cover. Let the strips set for 4 hours or up to overnight.
Cut into 1/2 inch pieces using a pizza wheel or scissors dusted with the confectioners' sugar mixture. Once cut, lightly dust all sides of each marshmallow with the remaining sugar mixture and store in an airtight container for up to a week.

I found this amazing Alton Brown recipe from FoodNetwork.com

Saturday, February 27, 2010

Fried Bananas

I wouldn't really call them fried bananas if it were me, but that is what it was/is called I guess....


This is a super simple recipe that has so many uses! All you need to have on hand is a banana, some sugar, a smidgen of butter, and a squirt of whipped cream (if desired).


Pre-heat the skillet and add about a tablespoon of butter. Cut up the banana to desired thickness and dredge in sugar. Place bananas in skillet until the sugar carmelizes, then  flip to the other side. Take out and enjoy hot! YUMMMMMM! Squirt some whipped cream if desired.

These bananas are great to add to buttermilk biscuits, crepes, creme brulee, pancakes, waffles, etc.

Friday, February 19, 2010

Pecan Pie


Ingredients:

3 Eggs
1 Cup Sugar
1/2 Cup Light Corn Syrup
1/2 tsp Salt
1 Tblsp Flour
2 Cups Pecans
2 tsp Vanilla
2 Tblsp Butter, softened
1 pre-made Keebler Ready Crust--whatever taste you prefer. I have  made it with Shortbread, Nilla Wafer, and graham cracker crust

Mix Thoroughly and add to a 9 inch crust, if you want a pastry pie crust it should be unbaked. bake for 1 hr at 325 *F


This is a super tasty and EASY recipe! It turns out wonderful every time I bake it!

Thursday, February 18, 2010

Lemon Curd

I found this recipe online here, and I love it! Super simple and super tasty! Next time I make it I will definitely have to remember to post pictures.

Ingredients:

1/2 Cup Fresh Lemon Juice
2 tsp finely grated Fresh Lemon Zest
1/2 Cup Sugar
3 Large Eggs
6 Tb Unsalted Butter, cut into bits

Whisk together juice, zest, sugar, and eggs in a heavy saucepan. Stir in butter and cook over med low heat, whisking frequently until curd is thick enough to hold marks of whisk and the first bubbles appear on the surface. (about 6 min). Then transfer the lemon curd into a bowl and chill (covering the surface with plastic wrap) until cold, about an hour or two. It can be stored in the fridge for about a week, which makes it great to just either have on hand, or when you are planning ahead.

Monday, February 15, 2010

Viking Professional Hand Blender

In order to make life easier on any home chef/cook a hand immersion blender seems to be necessary. I want to get the most out of my money and so I am in the research phase...

I have virtually come across the viking professional hand blender and wonder if anyone has used this hand blender, and if so, is it worth the price? It seems to have everything I would want/need, but I just don't know quite yet. I guess I need to find somewhere I could test it out! :)


Click here to be redirected to the Viking Website.

Tuesday, February 9, 2010

Chicken Cacciatore

I made this for dinner the other day and it was amazing. I found a similar recipe off the Food Network website, but didn't have all the ingredients on hand so I altered it to the following recipe and it turned out PERFECT!

Ingredients

8 Chicken Tenders, about 2 pounds
Sea salt and fresh ground black pepper
2 tsp Olive Oil
1 Medium Onion, thin sliced
1 bell pepper, thin sliced (any color)
1/2 pound- 1 pound of white button mushrooms (depending on how many mushrooms you like
2 garlic cloves, minced
1 (14.5 oz) can of diced tomatoes in juice
1 tsp of Italian Seasoning
1/8 tsp of red pepper flakes
2-3 tsp fresh Italian parsley, finely chopped

Directions:

**Rinse the chicken and pat dry. Season with sea salt and pepper. Make sure the chicken is room temperature before you start to cook.  Heat the oil in a saute pan over med high heat. Sear the chicken on both sides and then remove the chicken and set aside. Reduce the heat to medium and add the onion and pepper until  the onions sweat. Add mushrooms and stir occasionally. Once the mushrooms start to brown add the garlic and cook until the garlic becomes fragrant. Add the whole can of tomatoes (juice and all), Italian Seasoning, and red pepper flakes and a little more sea salt. Add the chicken breasts back in and simmer until the chicken is cooked all the way through--about 10 minutes. Just before serving stir in the Italian parsley and let slightly wilt. Serve over some orzo or a bow tie pasta. We ate it just as is and it was great!

** I brined the chicken tenders for about 20 minutes before I started the cooking process while I was deciding what to make. It was a simple brine mix of kosher salt and water.

Monday, February 8, 2010

Vita-Mix Countertop Blender


  Someday!!! I need to do more research, but everything I have heard/read about these amazing blenders makes me want ONE! You can use it to make smoothies, soups (even hot soup), and sauces. You can even use it for chopping nuts. AWESOME!

Saturday, February 6, 2010

Waffles

Do you or your kids LOVE waffles? Do you purchase store-bought frozen waffles because of the convenience of popping it into the toaster on a busy morning? If you plan ahead just oh so slightly you can make your own frozen, precooked waffles that are more economical and healthy than the store-bought counterpart. I make these waffles on Saturday mornings--sometimes doubling the recipe. I just let the extra waffles cool and seal in a gallon size freezer zip-lock bag until I want to partake of some tasty waffles and take out what we need and stick in the toaster! PERFECT!

I have had this recipe what seems like forever and I am pretty sure it is an old Betty Crocker recipe...

Ingredients:

1 3/4 Cup Flour
2 Tlb Sugar
1 Tlb Baking Powder
1/4 tsp salt
2 Large Eggs
1 3/4 Cup Milk
1/2 Cup melted butter
1 tsp Vanilla

Directions:

Preheat your waffle maker. In a medium bowl mix flour, sugar, baking powder, and salt. In another bowl add all other ingredients. Then add wet ingredients to the dry ingredients. Stir until moistened and slightly lumpy.  Spray your waffle maker with a little bit of nonstick cooking spray. Pour into grids according the the directions of your waffle maker. Some 4 section waffle makers require 1 to 1/4 cups of batter. I have a 2 grid Belgium waffle maker and I add about 1/3 of a cup to each grid. Depending on the heat of your waffle maker and how dark you like your waffles it could take 3-5 minutes. Enjoy!!!

Orange Julius

I was going through my recipe archives this morning and came across this simple, tasty, and kid-friendly recipe. I acquired this recipe from a Bosch cooking class. I just had to make it a part of our breakfast this morning. My kids are still too young/small to drink the entire recipe, so we freeze the remaining drink into popsicle molds and they are so tasty!

1 6 oz can frozen orange juice concentrate
2 Cups Milk
1 tsp Vanilla
1/3 Cup Sugar *
 Ice (optional and to the consistency you desire)

* I have reduced the sugar to 1/4 Cup and it is tasty too! Every little bit helps right? :) I have yet to try splenda or truvia in this recipe, but I bet it would work just the same.

I just add everything into my blender, push the lovely button, and let the amazing gadget to it's job. Pour and serve immediately! :) ENJOY! Just think, with one small glass your kids get the added benefit from the nutrients of milk and orange juice without even knowing it! If only we can add spinach to this drink...

Friday, February 5, 2010

Hot Mulled Apple-Orange Cider

I went to a baby shower that served this drink and was in love! The hostess would not give me the secret family recipe (completely understandable) so I went on the hunt for the recipe because it was THAT GOOD! I tried out many recipes (thanks to the internet) and have found what I think is the recipe, or something close to it! The original recipe came from Southern Living, December 1997.

1 Cup Water
1/2 Cup Sugar
2 (3 inch) Cinnamon Sticks
4 Whole Allspice
1/2 tsp ground ginger
4 Cups Apple Cider
2 Cups Orange Juice
1/4 Cup Lemon Juice

Bring 1 cup of water and sugar to a boil in a saucepan over medium heat, stirring constantly. Boil 3 minutes. Add cinnamon, allspice, and ginger. Reduce heat and simmer, stirring occasionally, about 10 minutes. Pour mixture through a wire-mesh strainer into a Dutch oven, discarding spices. Add apple cider and juices; bring to a boil and serve hot. The yield is about 7 1/2 Cups

To be redirected to Southern Living Recipe website, click here.

I must admit the recipe from that baby shower kept the spices in the Dutch oven and the hostess had slices of oranges in the drink. I have altered this recipe to more like hers. I have also, when possible, used all fresh ingredients and it is that much better.

Thursday, February 4, 2010

Bay and Lemon Brined Turkey

I got this recipe off of  the Food Network's website and the recipe is courtesy of Dave Lieberman. I made this for Thanksgiving a few years ago and it was a BIG hit! I honestly did not think I liked turkey up until this dish. It was always, in my opinion, dry--no matter who was the cook. I gave up trying to like this bird until this recipe came into my life. Thank you DAVE LIEBERMAN for introducing me to the wonderful world of brining poultry!

Ingredients: 

1 (12 to 15 pound) Turkey

For the Brine:

2 Gallons of water
1 Cup Sugar
1 Cup Kosher Salt
2 Lemons, sliced in 1/2
4 Bay Leaves
3 Cinnamon Sticks
Small handful of cloves

Instructions:

Combine all brine ingredients in a big stock pot large enough to hold the turkey. Make sure all the sugar and salt have been dissolved. Add the turkey and refrigerate at least 6 hrs (or overnight).

Preheat the oven to 350* F

Remove turkey from brine and transfer to a roasting pan with a rack. Stuff turkey with the lemon halves, bay leaves, and cinnamon sticks used in the brine. Cook the turkey for about 3 1/2 hours, basting every 40 minutes or so. If any part of the turkey gets too brown towards the end of cooking, shield with pieces of tin foil. When the turkey is done, juices should run clear from the breast and the legs should pull away from the bird easily. Remove from heat and let rest for 15-20 minutes before carving! Enjoy!!!

Tuesday, February 2, 2010

La Bete Noire :: The Black Beast

Thanks to a wonderful friend who made this phenomenal flourless chocolate cake for me for my birthday! I was in HEAVEN! She found this recipe on http://www.epicurious.com/recipes/food/views/La-Bete-Noire-235831. This recipe was originally found in Bon Appetit Magazine.


photo courtesy via

Ingredients:

Cake:
3/4 Cup Sugar
1 Cup Water
9 Tablespoons of Unsalted Butter, diced
18 Oz of bittersweet or semisweet chocolate, chopped
6 Large Eggs

Ganache:
1 Cup Heavy Whipping Cream
8 Oz of bittersweet or semisweet chocolate, chopped

Instructions: 

For the cake:

Preheat oven to 350*F. Butter 10-inch-diameter springform pan. Line bottom of pan with parchment round; butter parchment. Wrap 3 layers of heavy-duty foil around outside of pan, bringing foil to top of rim. Combine 1 cup water and sugar in small saucepan. Bring to boil over medium heat, stirring until sugar dissolves. Simmer 5 minutes. Remove from heat. (You are basically making a simple syrup. I wonder why the ratio isn't 1:1...)

Melt the butter in double boiler. Add chocolate and whisk until smooth. Whisk sugar syrup into chocolate; cool slightly. Add eggs to chocolate mixture and whisk until well blended. Pour batter into prepared pan. Line the roasting pan with paper towels and then place cake pan in large roasting pan. Add enough hot water to the roasting pan to come halfway up sides of cake pan.

Bake cake until center no longer moves when pan is gently shaken, about 50 minutes. Remove from water bath; transfer to rack. Cool completely in pan.

For ganache:

Bring whipping cream to simmer in small saucepan over medium heat. Remove from heat. Add chocolate and whisk until smooth. Pour over top of cake still in pan. Gently shake pan to distribute ganache evenly over top of cake. Refrigerate cake in pan until ganache is set, about 2 hours. DO AHEAD: Can be made 2 days ahead. Cover and keep refrigerated.
 
Run knife around pan sides to loosen cake; release sides. Cut cake into wedges and serve with whipped cream.

** I have altered the instructions slightly. The original recipe did not call for the double boiler. However, in the books I have been reading they explain that the double boiler is safer and keeps the consistancy of the temperature more than the direct heat and all of their similar recipes direct the cook to use such methods.

Monday, February 1, 2010

Bacon & Brussels Sprouts

Poor Brussels sprouts... they get such a bad rap and they are truly tasty! I found this recipe on Foodnetwork.com, feel free to click here to be redirected to the original recipe link. I have altered the recipe ever so slightly so here it is... It seems bacon fat makes many foods edible to many!

1 pound of thick bacon
1 medium onion, thin slice
8 garlic cloves, halved lengthwise
2 pounds of Brussels sprouts, trimmed and halved
sea salt or kosher salt and fresh ground pepper to taste

In a large, deep skillet, cook bacon med -high heat until browned. Transfer the bacon to paper towels to drain. Add onion and garlic to the pan, reduce heat to moderate heat  until softened (3-4 minutes) Remove the veggies from the pan and set aside. Add the Brussels sprouts in batches and continue to cook until they are golden brown. Add the reserved bacon and veggies back along with the salt and pepper. Cover with lid and cook until sprouts are tender, about 10 minutes.

Saturday, January 30, 2010

Garlic Rosemary Pork Tenderloin

My wonderful step mom gave me this recipe a few years back and I LOVE IT!

2 each 2-3 pounds of Pork Tenderloin, Trimmed
3/4 cup mild Olive Oil
1/4 cup Apple Cider Vinegar*
2 Tbsp fresh chopped Rosemary
1 Tbsp Kosher Salt
1 1/2 tsp fresh ground black pepper
3 cloves garlic, minced

* I have substituted with white wine vinegar and it turned out great!


Assemble Marinade. Place trimmed pork tenderloins in a gallon zip-lock bag. Pour marinade over the pork and seal. Place in refrigerator for 1-2 hrs.  About 30 minutes before you are ready to preheat the oven, take the pork out of the refrigerator to get to room temperature. Preheat the oven to about 400* F. (Grilling is another wonderful option) Place the probe of the meat thermometer in the thickest section of the meat. Cook the meat until the internal temperature reaches 160* F (Medium) or 170 *F (well done). Note: the meat will continue to increase in temperature a few degrees while it is resting so if you want the meat a true medium take out a couple degrees before 160*F. Let the meat rest for about 15 minutes before cutting. 


Sweet Chili Glaze

2 tsp Olive Oil
2 tsp chili powder
1/2 tsp toasted ground cumin
1/4 Cup of frozen pineapple juice concentrate, thawed*

In a small plan heat oil, chili powder and cumin over medium heat. When the mixture starts to sizzle and spices become fragrant, add the juice concentrate. Reduce heat and simmer until the mixture reduces to about 2 tablespoons. Allow to cool slightly and pour over the tenderloin!!! :)


* I have substituted orange juice concentrate and it is delicious!

Roasted Asparagus

I found this recipe in Cooking Light Magazine online about 8 years ago--but the recipe said to put them on the grill--which is good too.

1 pound of Asparagus, ends snapped off
3 Tbsp Balsamic Vinegar
2 Tbsp Fresh Lemon Juice
1 Tbsp Olive Oil
1 Tbsp low-sodium Soy Sauce
1/8 tsp fresh ground black pepper

Put all the ingredients together in a zip lock bag, seal and marinate for 30 minutes. Preheat oven to 400* F Place asparagus on baking sheet and discard marinade. Bake for about 15 minutes, or until your preference is achieved.

* You can also broil or grill them for about 10 minutes (5 min on each side)

Friday, January 29, 2010

The BEST Oatmeal Chocolate Chip Cookie EVER!

A neighbor just dropped me off some cookies and I devoured them! Yes, I know, I am pregnant...but I have been really good! I HAD to have this amazing recipe!

As a rule of thumb I try to uphold I try not to post recipes I have gotten from published books. But if someone gave me this recipe and says I may share the recipe I may or may not post it. If anyone is ever interested in the recipe, please comment and I will share.

This recipe I find myself feeling like for the common good of all men I need to share this delectable treat!


Oatmeal Chocolate Chip Cookies

1 1/4 C Flour
1 tsp Baking Soda
1 C Butter, softened
1/4 C Sugar
3/4 C Brown Sugar
1 Package of Instant vanilla pudding
2 Large Eggs
3 1/2 Oats
Chocolate chips
Nuts (optional)


Preheat oven to 375* F. Cream Butter and sugars. Add instant vanilla pudding, then add eggs. Add flour and baking soda. Add oats, then add chocolate chips. The consistancy is pretty thick. Bake for 10-12 minutes. HMMMMMMM

Thursday, January 28, 2010

SILPAT!!!

I literally use my silpats ALL the time! This amazing product transforms your jelly roll pans/ cookie sheets into nonstick bliss! Who needs parchment paper to line your sheets for some cookie recipes when you have these wonderful mats! I really wouldn't even want to make most cookies if I have to be without them anymore. Yes, I am that dedicated on this wonderful invention! WORD to the wise: don't even bother with the knock-off brands. I got a few as presents a couple of years back and they are NOT the same!!! This is one of those items you just buy the original because it is worth it!

Feel free to check out their website by clicking here.

I know you can purchase them and Bed, Bath, & Beyond, Amazon.com, Sur La Table, and many more locations!

Wednesday, January 27, 2010

Buttermilk Biscuits


I have been nervous attempting homemade biscuits because everyone always says how difficult it is to make...but I finally tried buttermilk biscuits hoping this would be a good experience. It was so easy, fast, and fun I will definitely make them again! They did make a mess in the kitchen, but totally worth it!

Tips: have the butter COLD and preheat the oven before you even get the ingredients together! When you are rolling out the dough, roll out and fold over 3x4 times to get the flaky goodness but DO NOT OVER WORK the dough!

This link is a great recipe for buttermilk biscuits from foodnetwork.com!  I would use cold butter instead  :)

Tuesday, January 26, 2010

Pan Fried Chicken


So here's my attempt at pan frying chicken.... It was so tasty and amazing! I am so glad I went to that free cooking class at Williams-Sonoma because it taught me how to keep the silly breading ON the bird for once!!!

I first brined the chicken for 30 minutes, dredged in seasoned flour, egg mixture, and seasoned flour again and pan fried these amazing pieces of chicken! It turned out so tasty I will definitely do more of this type of cooking!!!!

Tips: have your meat at room temperature and pat DRY before you start dredging! Have the oil at the appropriate temperature and don't overcrowd the pan!

Monday, January 25, 2010

Gygi Culinary Solutions Cooking Classes

Gygi Culinary Solutions also has cooking classes that are worth noting. Click here for the link to their cooking class schedule. Prices vary depending on the class and the classes are all different and sound wonderful. For example, they have an 8 part series called the Fine Art of Cooking that is $49 per class or $320 for the whole series.I have yet to enroll...I am still content taking free classes--but I fully intend on going someday!


Gygi Culinary Solutions is located @
3500 South 300 West
Salt Lake City, Utah
(801) 268-3316
Hours: 9am - 6pm Monday - Saturday

Sunday, January 24, 2010

Seared Scallop Spinach Salad I will find a recipe for you...

I ate at Macaroni Grill this last week and have found a new recipe I am trying to recreate. This salad seriously HIT the spot and I MUST figure it out! Click here for the limited time lunch menu link to Mac Grill. :)

Seared Sea Scallops on top of a warmed spinach salad--the greens just slightly wilted and tossed with aged proschiutto,  a bunch of roasted garlic cloves, fresh lemon and extra virgin olive oil vinegarette! OH MERCY was this delicious and nutritious (under 400 calories).

Has anyone already figured out the recipe? If so, please let me know....I would hate to reinvent this wheel. I will keep you posted on how my experimentation turns out...

Saturday, January 16, 2010

Baking At Home with the CIA

This is another essential book needed for any baker. I absolutely LOVE it! I love the explanations--once again the "why" and the "how" are described. This is a wonderful reference book that just so happens to have all the basic recipes included. I love the beautiful photographs as well--which really help when one is trying to understand new terminology.

I found this book for the best price on Amazon.com, feel free to click here to be redirected.

Cooking At Home with The CIA

CIA: Culinary Institute of America that is...


I found Amazon.com had it for the best price. Feel free to click here to be redirected to the amazon page.

I absolutely LOVE this book. This book offers essential techniques and recipes for any cook. I wanted a cookbook that explained the "why" and "how" of cooking that most cookbooks do not offer. Yes, I wanted recipes, but mostly to work on the techniques I desire to learn. It all boils down to a book that is the equivalent to a cooking 101 textbook. I did research professional chef textbooks...and felt like I was a fish out of water...I needed something more simplistic. I ADORE this book. It offers me most everything I need at this point of my cooking journey and I highly recommend this book. Most of my cooking adventures will be from this book and I can't wait to learn everything I can from it! I am so glad I bought it for my cooking adventures as well as for future reference.

Wednesday, January 13, 2010

Shortbread Cookies


Ingredients:

1/2 C butter, softened (1 stick)
1/4 C sugar
1 1/4 C Flour

Put all above mentioned ingredients in a medium size bowl. Mix with your hands until crumbly. (you can skip the next step if you want plain shortbread cookies) Then add any of the following:

a few drops of almond extract
chopped nuts (1/2 C)
coconut (1/2 C)
sugar sprinkles (2 Tb)
raisins (1/3 C)

After adding, or not adding, any flavor options (the mixture is crumbly), squeeze it together to make a ball of dough. Then pinch of little pieces and roll them to the size of a ping pong ball or golf ball. Grease a cookie sheet (or put parchment paper down) and place the balls on the cookie sheet. With a fork, press down the ball. It should make about 2 dozen cookies. Place in a pre-heated oven to 325* F and bake for 15-20 minutes. Let cool on rack.

Saturday, January 9, 2010

Williams- Sonoma has FREE cooking classes!

Williams-Sonoma has FREE cooking classes every Sunday morning (with the exception of two stores that are on Saturday morning). Please click here for this Month's free class schedule.

I just so happen to live near one of the two stores that holds their free cooking class on Saturday mornings instead of Sunday. This week was Braising-- I loved it. I knew some information on how to braise meats, but really felt like a "fish out of water" with braising the root veggies. I am more confident and will soon be trying out new recipes to solidify my new found knowledge on braising. I am excited!


Note to self:

Braising meats: take out of fridge about 30 minutes before and pat dry with paper towels before sticking on the hot pan.

Friday, January 1, 2010

The beginning...

With this new year I have decided to dive into the world of some culinary adventures more than ever before...and blog about my experiences. No, I don't intend this to become a motion picture, I just need to be able to remember what I learn along the way and maybe help others too. I have wanted to learn more about cooking & baking for a while now, but am finally ready.