Welcome

I am a stay-at-home mother of 3 living in Utah...who desires to learn more regarding cooking and baking. I hope through my culinary adventures I will learn enough to cook and bake decent food and maybe help fellow moms with their struggles in the kitchen.

Sunday, April 18, 2010

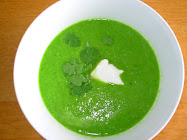
Fresh Asparagus and Pea Soup

Over Thanksgiving, my awesome sister-in-law, Amber, introduced me to Ina Garten's fresh pea soup recipe. I loved it! In fact, I wanted to make it today. I was so perplexed because I also wanted Emeril Lagasse's asparagus soup recipe. It then hit me...COMBINE and alter the two existing recipes, and change some things. My recipe is AWESOME!. Seriously, you should try this and let me know what you think!


Ingredients and tools:
2 (14 oz) cans/boxes of chicken stock
1 bundle of asparagus
1 (16 oz bag) of frozen petite peas
1 medium red onion, diced
2 tablespoons of olive oil
sour cream for garnish/to taste
cilantro for garnish/ to taste

hand-immersion blender is best, but if you don't have one, your food processor, if you don't have one, your blender. The blender will work, but the consistency will be not perfect.
slotted spoon

Directions:
In a medium stock pot, add the chicken stock and bring to boil. Get the asparagus, snap off the tuff ends and discard, cut the asparagus into 1.5 inches long and separate the spears from the stocks. Add the stocks into the boiling chicken stock and reduce heat and simmer 20-30 minutes. While the asparagus and stock is simmering, get the red onion, dice and sweat the onions in a pan with the olive oil. Go back to the stock: take the slotted spoon and retrieve the asparagus stems from the asparagus infused broth. Add the onion to the broth, bring to boil. Then add the asparagus spears and reduce heat to a more gentle boil. 5 minutes from being tender add the frozen peas and increase heat to bring back to boil. The peas should only take 3-5 minutes. Get the cilantro and and sour cream from the fridge. Once the peas are tender and floating, puree until the desired consistency. Put in dish, serve with the garnishes. YUMMY!!!! It seriously is so scrumptious good and super easy to make!!! I love the combination of these flavors! hmmm yum! Next time I make this I may retain the stems and blend them in with the rest so the asparagus flavor would be more pronounced....


Honestly, I did change quite a bit of the recipes; if you are curious of the two original recipes click here for Ina Garten, and here for Emeril Lagasse.

Thursday, April 15, 2010

Baked Jalepeno Poppers

Ingredients:
  • 12 fresh jalepeno peppers, halved lengthwise, stems, seeds, and membranes removed
  • 6 oz cream cheese, softened
  • 1 ½ cups grated sharp cheddar cheese
  • ½ teaspoon ground paprika
  • ½ teaspoon ground cumin
  • ½ teaspoon garlic powder
  • 2 large eggs
  • 2 tablespoons of milk
  • 2 cups panko crumbs (or fine dry breadcrumbs)
  • 1 cup all-purpose flour
Instructions:
  1. Preheat oven to 350*F. Lightly grease baking sheet and set aside.
  2. In a medium bowl, cream together the cream cheese, cheddar cheese, cumin, garlic, and paprika.
  3. In a small bowl, beat the eggs and milk together.
  4. In separate shallow dishes, pour the panko in one and the flour in the other and set aside.
  5. Fill each pepper up to the top with cheese mixture. (In large jalapeno peppers it could be a tablespoon.)Now you are ready for the breading “assembling line.” Remember to do one at a time and keep one hand as your “wet” hand and one hand as your “dry” hand!
  6. First you dredge it in flour
  7. Second you submerge it in milk/egg mixture
  8. Finally you dredge it in panko, pressing it in to coat it well. (You may need to repeat the process.)
  9. Place directly on baking sheet, cut side up, and bake until the crust is golden brown and the filling is runny. (about 30 minutes)
* I had a ton of jalapeƱo peppers from my garden and wanted some poppers, but did not want the fat from deep frying them. So I came across some on the web and changed the recipe to this. I made them today for a little potluck and they were devoured! Ohh this was tasty! If you try it, let me know what you think! Next time I think I will add more spice, but I didn't want to be too daring on the first attempt. :)

Friday, March 5, 2010

Homemade Marshmallows

 Thank you, Alton Brown!!!

 Ingredients

  • 3 packages unflavored gelatin
  • 1 cup ice cold water, divided
  • 12 ounces granulated sugar, approximately 1 1/2 cups
  • 1 cup light corn syrup
  • 1/4 teaspoon kosher salt
  • 1 teaspoon vanilla extract
  • 1/4 cup confectioners' sugar
  • 1/4 cup cornstarch
  • Nonstick spray

Directions

Place the gelatin into the bowl of a stand mixer along with 1/2 cup of the water. Have the whisk attachment standing by.
In a small saucepan combine the remaining 1/2 cup water, granulated sugar, corn syrup and salt. Place over medium high heat, cover and allow to cook for 3 to 4 minutes. Uncover, clip a candy thermometer onto the side of the pan and continue to cook until the mixture reaches 240 degrees F, approximately 7 to 8 minutes. Once the mixture reaches this temperature, immediately remove from the heat.
Turn the mixer on low speed and, while running, slowly pour the sugar syrup down the side of the bowl into the gelatin mixture. Once you have added all of the syrup, increase the speed to high. Continue to whip until the mixture becomes very thick and is lukewarm, approximately 12 to 15 minutes. Add the vanilla during the last minute of whipping. While the mixture is whipping prepare the pans as follows.

For regular marshmallows:

Combine the confectioners' sugar and cornstarch in a small bowl. Lightly spray a 13 by 9-inch metal baking pan with nonstick cooking spray. Add the sugar and cornstarch mixture and move around to completely coat the bottom and sides of the pan. Return the remaining mixture to the bowl for later use.
When ready, pour the mixture into the prepared pan, using a lightly oiled spatula for spreading evenly into the pan. Dust the top with enough of the remaining sugar and cornstarch mixture to lightly cover. Reserve the rest for later. Allow the marshmallows to sit uncovered for at least 4 hours and up to overnight.
Turn the marshmallows out onto a cutting board and cut into 1-inch squares using a pizza wheel dusted with the confectioners' sugar mixture. Once cut, lightly dust all sides of each marshmallow with the remaining mixture, using additional if necessary. Store in an airtight container for up to 3 weeks.

For miniature marshmallows:

Combine the confectioners' sugar and cornstarch in a small bowl. Line 4 half sheet pans with parchment paper, spray the paper with nonstick cooking spray and dust with the confectioners' sugar mixture.
Scoop the mixture into a piping bag fitted with a 1/2-inch round piping tip. Pipe the mixture onto the prepared sheet pans lengthwise, leaving about 1-inch between each strip. Sprinkle the tops with enough of the remaining cornstarch and sugar mixture to lightly cover. Let the strips set for 4 hours or up to overnight.
Cut into 1/2 inch pieces using a pizza wheel or scissors dusted with the confectioners' sugar mixture. Once cut, lightly dust all sides of each marshmallow with the remaining sugar mixture and store in an airtight container for up to a week.

I found this amazing Alton Brown recipe from FoodNetwork.com

Saturday, February 27, 2010

Fried Bananas

I wouldn't really call them fried bananas if it were me, but that is what it was/is called I guess....


This is a super simple recipe that has so many uses! All you need to have on hand is a banana, some sugar, a smidgen of butter, and a squirt of whipped cream (if desired).


Pre-heat the skillet and add about a tablespoon of butter. Cut up the banana to desired thickness and dredge in sugar. Place bananas in skillet until the sugar carmelizes, then  flip to the other side. Take out and enjoy hot! YUMMMMMM! Squirt some whipped cream if desired.

These bananas are great to add to buttermilk biscuits, crepes, creme brulee, pancakes, waffles, etc.

Friday, February 19, 2010

Pecan Pie


Ingredients:

3 Eggs
1 Cup Sugar
1/2 Cup Light Corn Syrup
1/2 tsp Salt
1 Tblsp Flour
2 Cups Pecans
2 tsp Vanilla
2 Tblsp Butter, softened
1 pre-made Keebler Ready Crust--whatever taste you prefer. I have  made it with Shortbread, Nilla Wafer, and graham cracker crust

Mix Thoroughly and add to a 9 inch crust, if you want a pastry pie crust it should be unbaked. bake for 1 hr at 325 *F


This is a super tasty and EASY recipe! It turns out wonderful every time I bake it!

Thursday, February 18, 2010

Lemon Curd

I found this recipe online here, and I love it! Super simple and super tasty! Next time I make it I will definitely have to remember to post pictures.

Ingredients:

1/2 Cup Fresh Lemon Juice
2 tsp finely grated Fresh Lemon Zest
1/2 Cup Sugar
3 Large Eggs
6 Tb Unsalted Butter, cut into bits

Whisk together juice, zest, sugar, and eggs in a heavy saucepan. Stir in butter and cook over med low heat, whisking frequently until curd is thick enough to hold marks of whisk and the first bubbles appear on the surface. (about 6 min). Then transfer the lemon curd into a bowl and chill (covering the surface with plastic wrap) until cold, about an hour or two. It can be stored in the fridge for about a week, which makes it great to just either have on hand, or when you are planning ahead.

Monday, February 15, 2010

Viking Professional Hand Blender

In order to make life easier on any home chef/cook a hand immersion blender seems to be necessary. I want to get the most out of my money and so I am in the research phase...

I have virtually come across the viking professional hand blender and wonder if anyone has used this hand blender, and if so, is it worth the price? It seems to have everything I would want/need, but I just don't know quite yet. I guess I need to find somewhere I could test it out! :)


Click here to be redirected to the Viking Website.